Sunday, August 26, 2012

A Few Updates (2011 Challenger Oil Change, Loose Drain Plug, SpeedLogix Catch Can)

It has been a awhile so I figured I’d post an update.  We have a couple of projects going in the garage right now.  First is a general cleaning – this garage gets filthy after a while!  Cleanign it up and sweeping up all the dust and dead bugs is a real pain but the work is so worth it.  The place “feels” so much better when it is uncluttered. 

We’re also installing a security system – it’s something I’ve wanted for a while but just never got to it. 

The Challenger is a lot of fun to own.  I’m still amazed by all the looks it gets – I’ve even noticed folks driving by and taking pictures of it while going down the highway.

I did my first oil change yesterday and I was a bit surprised to discover that the oil drain plug was only FINGER TIGHT!  I went to put the socket on there and saw the bolt turn as I touched the plug!  I was immediately consumed with dread as I removed the rest of the bolt from the oil pan, worried that no dirty oil would follow.  Fortunately that was not the case.  The dealer I bought the car from must not had torqued the plug adequately.  I was lucky that it didn’t drain out onto the highway – another reason why I don’t like trusting my car maintenance to others.


IMG_0803

Up on the lift looking pretty.

IMG_0804

  The last bit oil dripping out.


IMG_0805

All done.

I used an Amsoil oil filter, 7 quarts of Mobile 1 0w-40 synthetic oil and torqued the oil plug to 25 ft lbs.  Note that Dodge has recently changed the recommended oil viscosity from 5w-40 to 0w-40.

While the car was on the lift, I also rotated the tires and took the opportunity to clean the wheel wells, shrouds, shocks, calipers, etc.  Justin worked hard at washing the inside of the wheels to get a clean dust free look.

IMG_0809

The end result.


I’d like to also take this opportunity to plug the Green With Envy catch can offered for sale by SpeedLogix.  This thing is easy to install and looks great under the hood!


IMG_0810

Catch Can by SpeedLogix in GWE.

Monday, April 30, 2012

Please Welcome a New Member of the Family to the Garage!

Well, I finally did it.  I’ve lost a lot of my hair and I just turned 41 so it seemed like a great time to go out and buy this:::

photo1

It’s a 2011 Challenger SRT8 with the 392 470HP HEMI motor.  I found it in Pennsylvania with only 3200 miles on it and painted in the coveted “Green with Envy” color.  I plan for this baby to be a beautiful garage ornament and hope to be able to resist the urge to put lots of miles on it.  I still have the G35 and will continue using it as my daily driver. 

I don’t really have a lot of mod plans at the moment.  The previous owner had installed a Corsa cat back exhaust on it already so that is obviously off of the list.  It sure sounds good, btw.  I may install a backup camera to help with all the blind spots and maybe a catch can and/or cold air intake.  We’ll see!

Anyway, I apologize for the lack of posts lately.  I’ll try to get back on track.  I have some work to do on the ‘01 2500 this coming weekend.  This includes a new power steering box and shaft to help get rid of all that steering slop (I hope).  I’m also changing out all of the factory lighting for new fixtures and will be replacing the shocks.  I’ll post an update when I can!

Tuesday, November 1, 2011

Hidden Dangers in Automobiles

Well folks, it has been a long time since I’ve taken the time to post to the blog.  As usual I’ve done a number of things to keep busy but just haven’t been documenting them as much.  We sold the 2005 Dodge Ram so that my wife could upgrade to a more comfortable vehicle.  We now have a 2011 Infinti QX56.  I was able to change the oil in it for the first time last month so that was exciting. 

I plan to upgrade the steering box and shaft on the 2001 Ram this winter so stay tuned.  I may post about it.  The steering is so terrible on that truck I am often concerned about safety.  Especially when towing!  …

Speaking of safety – I was recently contacted by someone by the name of Brian Turner.  He has a love for cars just like many of us and has been working hard to spread the word about harmful chemicals that are often found in classic cars.  At his request I am posting his blog post right here and I thank Brian for his contribution!

----------------------------------------------------------------------------------

Hidden Dangers in Automobiles

Brian Turner

For lovers of cars, especially classic older models, they should be aware that there are cases where these vehicles contain hidden toxins. While this is not a prevalent threat, it is important that men and women educate themselves about what these substances are and what kinds of conditions they can potentially cause.


Air conditioners contain a substance called Freon that is essential to the functioning of the unit. Especially in older cars where the seals and vales might have degraded a bit, this should be checked out. For cars that are being sold or salvaged, professionals can look into this and, if needed, dispose of the Freon properly. Amateurs should be sure to avoid touching the compound or breathing it in in any manner.


Mercury can also be found in some components of cars and trucks, most notably thermostats and even fuses. The element is toxic when found in large enough quantities, and should be handled by an expert with the proper equipment and protective gear. Although it is most known as the basis of common household thermometers, it should always be handled with considerable care. For those who are restoring older cars, gloves and masks are probably a good idea when working with the thermostat and other components that regulate the overall temperature.


Though not as harmful unless they are taken in directly, antifreeze and even gas and oil must be watched carefully. For those that work on their cars outside of their own homes, leaking liquids can ultimately cover the driveway or the yard, where young children or pets can potentially consume them. Antifreeze must be carefully watched in this regard, as it is sweet tasting and attractive to toddlers who don’t know any better.


Asbestos, too, can be found in some parts of vehicles as insulation. Asbestos can lead to mesothelioma and other potentially serious conditions, so men and women should be quite careful with exposure to this substance. If they are restoring a car and are not quite sure how to deal with asbestos, they should always seek professional help. If they believe they have suffered some degree of exposure to the material, then they should seek medical advice from a trusted physician in the area.

AsbestosCars Even some plastics have been known to be linked to cancer cases. When working with the internal guts of a car, precautions should always be taken. For car enthusiasts who are a bit unfamiliar with some of the finer points of safety, they should conduct a substantial amount of research before they begin to handle unfamiliar materials. Experts should be kept close at hand in case a question comes up or advice is needed.

Monday, October 11, 2010

Busy Weekend! AV System Setup, Wood Stove Painting and New Hydraulic Hoses for The Wood Splitter.

I’ve been looking forward to getting the TV going for weeks! I installed the TV up on the wall about 5 or 6 weeks ago and scheduled a DirecTV install only to find out that I didn’t have the clearance for a good satellite signal. We rescheduled that day and cut down the trees last weekend. The DirecTV guy came back this week only to tell us that the dish wasn’t on the work order and he didn’t have the parts. GEESH! Anyway, he put in the extra effort and came back the next day to make it happen. Once the receiver was installed it was time to install the receiver and speakers that Donald got for me. The electronics consisted of a Proficient M40 plus two 6.5 inch indoor/outdoor speakers. Initial tests with the TV and its built in speakers just didn’t cut it. I needed more volume!

001

The M40.

003

One of the speakers fresh out of the packaging.

So the biggest challenge with this project was finding a location to put the electronics including both the stereo receiver and the satellite receiver. Initially I thought I’d put it in an empty shelf on one of my work benches but I thought maybe that would be a poor decision given that my drill press is right above it!!! All I would need is for a few metal shavings to fall into one of the heat vents and ZAP! Because of this I decided that I needed to build a small wooden shelf for the electronics to sit on.

I measured out the biggest component which was the stereo receiver and decided that a platform of about 16x18 inches would be sufficient. I also wanted the electronics to be placed near the TV so that I could point the remote in the general direction of the TV and have it work as opposed to pointing up to the TV for one thing and then down low to the receivers for another. This meant that the shelf needed to be placed up high on one of the horizontal beams in the garage. Obviously because these beams are only about 8 inches deep I needed to build some extra support into the shelf.

005

The first step was to mark off the beam line.

008

I needed three of these to help support the shelf.

009

Clamping them like this made it very easy to drill holes and then screw in wood screws to hold it all together.

013

All three pieces applied to the main shelf piece.

015

Some stain and varnish

016

018

019

020

This is what the shelf looks like mounted up on that beam. I used three self tapping screws to set it into place.

004

This is the speaker mount. A single self tapping screw in the middle was all it took to securely mount the speakers to the beam.

023

The receivers are stacked here on the shelf and the speakers are mounted exactly 80 inches from the corner of the garage. A sound check proves to be awesome. Everything looks and sounds GREAT!

The next project was to repaint the wood stove. We had a temporary leak in the chimney last year and it caused some rust on the top of the stove. I ordered some wood stove paint online (metallic brown was the color) and began sanding off the rust and loose paint.

028

This is the paint we used.

026

I picked this up at Ace. It’s a rust/paint remover and it did a great job.

024

The stove after using that bit to scrape off all the crud. We taped off the stack and window. We also put some plastic around the bottom to keep the paint off the floor.

025

A closer look of the post sanded finish.

030

A couple of coats in. Looks pretty good but definitely not brown! It looks gray to me.

041

OK done. Once the last coat set we used a hand broom to buff it all out. The color evened out nicely afterwards. We built a fire in it even though it was 86 degrees that day because we wanted to air out any fumes while the shop was ventilated.

043

032

The innards of my Robotron 2084. I have some new DRAM chips coming and I am hopeful that it will begin working again. I spent some time on this but need those RAMS to proceed.

034

And finally the wood splitter. We pulled it out of the weeds; it was almost like it was velcro’d to the woods! After pulling it into the garage we began to remove all the hydraulic hoses. One of them was severely cracked and all but one were in need of repair. After taking them off we took them to a local shop for replacement. It should be back in action just in time for cooler log splitting weather!

I know it has been a while since I’ve posted anything auto mechanic related but I think that will change soon. I have a persistent transfer case leak on my 2001 Ram which I think will require me to drop the case to repair. I replaced the rear seal but that didn’t fix it. This will be new territory for me, so I’ll definitely document it here if I need to work on it!

Monday, October 4, 2010

TV in The Garage and a Neglected Log Splitter

Not too much to report this week, but I am giving the garage a major upgrade: HD Satellite TV.  I bought a flexible tv mount from my brother and installed it in the corner of the garage near the lift.  I spend the vast majority of my time in that area and this time of the year I miss so much football from being in the garage on Sundays that it only made sense to put a TV there. 

I had an extra 40 inch TV that I either needed to sell or do something else with it so I decided the garage would would be a great location for it.

009

I hooked up the RV’s DirecTV receiver and dish to test it out and came to the conclusion that the TV just didn’t output enough volume to handle the space.  I’ll be installing speakers and a simple stereo sound system in the coming days to help amplify the sound.  My brother is an electronics dealer/installer and I’m getting the equipment from him.  Pivotal Audio Video (http://www.pivotalav.com/index.html) – highly recommended!  : )

DirecTV is coming tomorrow to install the HD dish and DVR.  I actually had to break out the chain saw and cut down some trees to make room for the signal.

011

A couple of those trees were about 16 inches in diameter but they all fell in a nice non shop threatening manner so all is good.

Now I just need to get the log splitter back into operation!

012

This is my next project.  It needs new hydraulic hoses and a general reconditioning (oh and some weed removal).  I’ll post the progress here so stay tuned.

Monday, September 6, 2010

A New Update; A Small Change to the Garage and Some Other Stuff (including some questionable shop practices?)

It has been a while since I posted to this blog. No one ever comments on my posts so that kind of saps me of my motivation to spend a lot of time talking about projects in the garage, but thanks to “anonymous” who posted a gratifying comment this week I decided to post again. It definitely means a lot when I know that my posts are helpful to others out there. Thanks “Anonymous”, you rock!

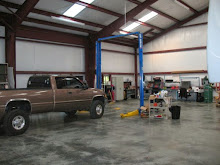
I was long overdue to do some routine maintenance on my old Dodge Ram(2001) so I decided to pull it into the shop this week. Holy cow it took us something like 5 times to get the truck straight into the lift so I decide enough was enough and it was time to put some sort of guides onto the floor. Check this out:

033 034

As you can see in the above pics we took some yellow duct tape and marked our parallel lines from the inside of the lift. Because this rotary lift is built with a bit of angle between the posts it is really hard to judge how straight you are as you approach the lift. These lines help TONS when positioning a vehicle in the lift – especially if you have someone standing up front spotting for you. As you know, if the vehicle isn’t straight you run the risk of having one of the arms being unable to reach the frame securely which introduces some hazard to the job.

Doing this was fun and allowed us to practice some math skills at the same time. Each line runs 12 feet towards the garage door from the lift posts. Between the posts, the lines were 92.5 inches apart. Doing some simple geometry, we were able to compute that the end point of each line should be 171.15(if I remember correctly) inches from the opposing start point. Think right triangle! Once we measured everything out we had a perfectly square markup. Next we chalk lined the run and laid down the tape. Easy! If I ever get an epoxy floor, I’ll make sure lines similar to this are painted permanently onto the concrete.

Once I got the truck onto the lift it was time to focus on that routine maintenance. I’ve bought a lot of crap for my vehicles, but it turns out that a lot of it isn’t really crap at all. Check out this oil pan drain plug, for instance.

035

I got this thing from Geno’s Garage and have not regretted it! The cool thing about it is that it has a perfectly secure seal until you are ready to drain the oil. One simply pushes the lever out of the notch and moves it to begin draining the oil. There is absolutely no risk of stripping the threads in the pan.

036

037 The best thing about this drain plug? No oil stained hands as you remove a plug during the last few threads.

Another great addition to the truck? Mag Hytec differential covers. This one for my rear differential, for example:

039 The great thing about these things is that they come with a very high quality dip stick to help you determine not only the quantity of lubricant, but the quality as well. I pulled this stick today and discovered some really dirty looking fluid. Draining it was easy because of the drain plug on the bottom.

038

Fast Coolers. This truck has a 6 speed manual transmission on it. I installed some Fast Coolers on it a while back and while I have no idea if they have helped curb transmission temps I do feel more confident pulling the 5th wheel knowing that they are there.

040 I do have one complaint though. There is no dipstick to gauge fluid level. On the top of the right cooler there is a fill plug with a magnet on the end but because it’s not really in the fluid it doesn’t really pick up any metal. I came really close to pulling it all apart today to clean up the internal magnet but decided against it for now. I did drain it and will fill it with fresh oil this week as soon as it arrives.

OK, so to the questionable shop practices issue. A few weeks ago I did a brake job on my G35.

003 013 As I was working on the car everything was going really well until I took out the old pads and noticed something suspect on one of the pads from the drivers side:

019

Does anyone see a problem with this picture? Here is the pad from the other side:

020 Obviously the drivers side indicator has been bent to produce the typical sounds associated with a worn pad much sooner than it should produce those sounds. The question is, was this a factory defect or was this bent in the shop. I took the car in for routine maintenance early after purchase before my garage was constructed, so I wonder. Obviously I could have waited to do this job 10 or 15 thousand miles if this defect wasn’t present.

Anyway, that’s it for now. Stay tuned for an update that includes some home improvement work that is going on here. Thanks for reading! Wayne

Saturday, April 10, 2010

Food Lion Auto Fair at the Charlotte Motor Speedway

We hitched up the camper yesterday and headed down to Charlotte for this auto show. Specifically I wanted to see the new Mk4 Roadster from Factory 5 Racing. I really wanted to check one out, touch it and sit in it before making the plunge and ordering a kit.

001 Hitched up and ready to go.

018

This placard was next to the car.

015 An interior view of the cockpit. I was quite surprised that it was as spacious as it was. I sat in it and my left knee felt too high but the F5 rep there said they had optional seats that had less padding and sat lower to the floor to help fix that. The foot box was fine for my size 14s. I don’t think I would have any problem working with the pedals.

016 A view of the Ford Racing GT 4.6L engine.

017 A view from behind the car.

022 I really liked the colors of this one. It was a somewhat pewter color that looked great. I’ll keep this pic around for future reference.

Below you’ll find pics of other cars at the show. I’ll definitely return in the coming years to learn more about cars.

006 007

008

009

010

011

012

013

014

020

021

023

024