Monday, September 6, 2010

A New Update; A Small Change to the Garage and Some Other Stuff (including some questionable shop practices?)

It has been a while since I posted to this blog. No one ever comments on my posts so that kind of saps me of my motivation to spend a lot of time talking about projects in the garage, but thanks to “anonymous” who posted a gratifying comment this week I decided to post again. It definitely means a lot when I know that my posts are helpful to others out there. Thanks “Anonymous”, you rock!

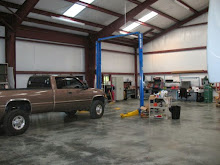
I was long overdue to do some routine maintenance on my old Dodge Ram(2001) so I decided to pull it into the shop this week. Holy cow it took us something like 5 times to get the truck straight into the lift so I decide enough was enough and it was time to put some sort of guides onto the floor. Check this out:

033 034

As you can see in the above pics we took some yellow duct tape and marked our parallel lines from the inside of the lift. Because this rotary lift is built with a bit of angle between the posts it is really hard to judge how straight you are as you approach the lift. These lines help TONS when positioning a vehicle in the lift – especially if you have someone standing up front spotting for you. As you know, if the vehicle isn’t straight you run the risk of having one of the arms being unable to reach the frame securely which introduces some hazard to the job.

Doing this was fun and allowed us to practice some math skills at the same time. Each line runs 12 feet towards the garage door from the lift posts. Between the posts, the lines were 92.5 inches apart. Doing some simple geometry, we were able to compute that the end point of each line should be 171.15(if I remember correctly) inches from the opposing start point. Think right triangle! Once we measured everything out we had a perfectly square markup. Next we chalk lined the run and laid down the tape. Easy! If I ever get an epoxy floor, I’ll make sure lines similar to this are painted permanently onto the concrete.

Once I got the truck onto the lift it was time to focus on that routine maintenance. I’ve bought a lot of crap for my vehicles, but it turns out that a lot of it isn’t really crap at all. Check out this oil pan drain plug, for instance.

035

I got this thing from Geno’s Garage and have not regretted it! The cool thing about it is that it has a perfectly secure seal until you are ready to drain the oil. One simply pushes the lever out of the notch and moves it to begin draining the oil. There is absolutely no risk of stripping the threads in the pan.

036

037 The best thing about this drain plug? No oil stained hands as you remove a plug during the last few threads.

Another great addition to the truck? Mag Hytec differential covers. This one for my rear differential, for example:

039 The great thing about these things is that they come with a very high quality dip stick to help you determine not only the quantity of lubricant, but the quality as well. I pulled this stick today and discovered some really dirty looking fluid. Draining it was easy because of the drain plug on the bottom.

038

Fast Coolers. This truck has a 6 speed manual transmission on it. I installed some Fast Coolers on it a while back and while I have no idea if they have helped curb transmission temps I do feel more confident pulling the 5th wheel knowing that they are there.

040 I do have one complaint though. There is no dipstick to gauge fluid level. On the top of the right cooler there is a fill plug with a magnet on the end but because it’s not really in the fluid it doesn’t really pick up any metal. I came really close to pulling it all apart today to clean up the internal magnet but decided against it for now. I did drain it and will fill it with fresh oil this week as soon as it arrives.

OK, so to the questionable shop practices issue. A few weeks ago I did a brake job on my G35.

003 013 As I was working on the car everything was going really well until I took out the old pads and noticed something suspect on one of the pads from the drivers side:

019

Does anyone see a problem with this picture? Here is the pad from the other side:

020 Obviously the drivers side indicator has been bent to produce the typical sounds associated with a worn pad much sooner than it should produce those sounds. The question is, was this a factory defect or was this bent in the shop. I took the car in for routine maintenance early after purchase before my garage was constructed, so I wonder. Obviously I could have waited to do this job 10 or 15 thousand miles if this defect wasn’t present.

Anyway, that’s it for now. Stay tuned for an update that includes some home improvement work that is going on here. Thanks for reading! Wayne

Saturday, April 10, 2010

Food Lion Auto Fair at the Charlotte Motor Speedway

We hitched up the camper yesterday and headed down to Charlotte for this auto show. Specifically I wanted to see the new Mk4 Roadster from Factory 5 Racing. I really wanted to check one out, touch it and sit in it before making the plunge and ordering a kit.

001 Hitched up and ready to go.

018

This placard was next to the car.

015 An interior view of the cockpit. I was quite surprised that it was as spacious as it was. I sat in it and my left knee felt too high but the F5 rep there said they had optional seats that had less padding and sat lower to the floor to help fix that. The foot box was fine for my size 14s. I don’t think I would have any problem working with the pedals.

016 A view of the Ford Racing GT 4.6L engine.

017 A view from behind the car.

022 I really liked the colors of this one. It was a somewhat pewter color that looked great. I’ll keep this pic around for future reference.

Below you’ll find pics of other cars at the show. I’ll definitely return in the coming years to learn more about cars.

006 007

008

009

010

011

012

013

014

020

021

023

024

Tuesday, April 6, 2010

Truck Interior Finished (almost) and a Nice Distraction From Reality

So this past weekend I almost finished the truck interior restoration. I’ve been meaning to post the latest pics but just haven’t had the time. Well on top of that I have a speaking thing to do at tomorrow’s Triangle Game Conference in Raleigh. I absolutely hate public speaking; the feeling I get when that first squirt of adrenaline hits my blood stream is not a good one. But I’m manning up and will give it my best. In the meantime I am writing to my blog so I can think about something else. Funny thing is that as I write this blog I continue to write about the public speaking thing. WTF?!?!?

Ok, on to the truck. I spent a lot of time on the truck this past weekend. It was a three day weekend because of the Holiday so it was good time to catch up on the project. Also, I want to take the camper to Charlotte this weekend for a hotrod show so that I can check out Factory Five’s latest Roadster, the Mk4. So here is a picture diary of the truck project. By the way, did I mention that I am going to be on a panel tomorrow at TGC?

I got a Clarion VZ400 DVD receiver to go into the truck and replace the OEM radio. I wanted a system with an LCD screen, HD radio and the ability to hook up two rear view cameras; one that activates on reverse and another one to serve as a rear view mirror when going down the street with the camper.

image This is the official image of the radio.


image This is the rear view camera. It’s a Kenwood and it’s not as big as it looks!


001 I ordered the stuff from Crutchfield. Firstly I have to say that crutchfield is awesome. Good support and they even sent me a thank you card! Another good thing about them is that they sent harness adapters for the truck. There was a printout that described what each wire did; left front +, left front –, etc. And the colors actually matched the colored wires on the receiver!

002 So the first step was to connect all the wires together. I would strip them using this super cool stripper (and my friends know that I like super cool strippers). Just kidding… no no really.


003 Wind them together.

004 Not long ago my father in law Stan lectured me for the fact that I never soldered the wires together; only wrapping them in electrical tape. I am happy to announce that I have changed my evil ways.


007 This is the door panel with the old speaker removed. Note someone should start a drinking game where they drink a shot every time a beer can is in a photo.


008 This is the new speaker installed in the rear door. These were a challenge because the previous owner had disconnected the wires under the dash to install some sort of aftermarket system. It took us a while to figure out why the speakers weren’t getting a signal. We eventually ran new wires and had to splice into the harnesses. Don’t worry, Stan, I used solder.


009 This is the new radio test wired into the truck. I did this to test all the speakers, camera etc.

010 Holy cow. What a mess. At this point I didn’t think it would ever get done.


011 New front 6x9’s installed.

015 Next I needed to focus on the rust problem that we discovered once the carpet was removed. Water had settled in under the drivers side seat and began to rust the metal.

016 I always wanted to use this thing. It’s been in my toolbox and I finally get to use it. It totally thrashed the rust.


017 Then a little elbow grease to get the tight spaces. After that we put some sort of rust conversion stuff on there to convert the rust to something inert. Then we painted it.


023 The paint applied. Looks much better.

024 The radio in the dash. I have NO IDEA how all those wires fit behind it.

025 OK, the carpet was next and I was pretty intimidated. The carpet came pre formed for the truck but all holes and trim had to be cut to fit. The whole time I was worried about screwing up. We started at the back. We used the old carpet on the floor of the garage as a gauge and began cutting.


026 Getting further and it’s starting to look good!

027 Hey! Your feet better be clean!


028 That’s a wrap. The bolt holes have been cut, the edges have been trimmed, etc.


029 Another view. I was very happy with the results!


001 Now it’s time to put in the finish pieces to hold the carpet down.

003 The rear bench seat is in and Justin is checking it out. It was very easy to put back together and the plastic trim pieces hide the subtle carpet flaws perfectly.

004 The drivers seat in.

005 All the seats back in the truck. They were very easy to install!

006 I ordered new door rubber for a better, water tight seal. It was super easy to install.

008

I never could find replacement door trim so I just spent some time cleaning up the old stuff. Came out pretty good.

009

Another angle…of Justin’s dirty foot.

010 Looking good!

I’ll have more pictures later once the door panels are on and the dash is back together. Wish me luck tomorrow!!!