Thursday, April 1, 2010

Interior Restore Part 2

Well today I finished all of the upholstery work. I still need to do the door panel leather but the seats are done. Tomorrow I’ll begin work on the radio install as well as the new dash cover.

Pics of the leather seats are below:

001 The center console was the worst of the bunch. We had to snap off retaining trim to get access to the old cloth which was tacked down by stables. After ripping that off we were able to put the new leather on. In this pic you can see the new leather as it was stapled down.


002 Broader view.


003 This is the piece after it was done. It’s basically the cap on the center console compartment.


004 This is the pneumatic stapler we used to tack the leather. $25 at Harbor Freight!


005 Another shot.


006 Tacking the retaining trim back down over the new covering.


007 After cutting the leather to fit around the hatch release button.

008 We’re putting the leather cover of the bottom half of the center console. There wasn’t much leather to work with here so it was pretty tight. My hands are still sore.


009 Stapled down.

010

And now the retaining trim has been snapped down.


011 Getting there.


012 Finished product all put back together. NOT BAD!


013 And finally the drivers chair. These are the internals of the chair to give you an idea of how all the electronic comfort options work.

014 This chair was very similar to the passenger side from the last update so it was pretty easy at this point. I can’t wait to see them in the truck.


Tomorrow I begin work on the new audio system. Stay tuned for an update.

Sunday, March 28, 2010

2001 Dodge Ram Interior Restoration

I’ve had this truck for a long time and after many camping trips with Les and the kids the interior has become a little worse for wear. This year I bought some new leather upholstery from LeatherSeats.com. I also picked up a new carpet from StockInteriors.com. I chose a two tone leather and a mist gray carpet.

The first step was to remove the seats and carpet.

052 After the seats were unbolted and removed the carpet looked terrible! Wow a lot of crud fell under the seats.

054

The seats out and on the garage floor.

057 Justin helped remove the rear bench seat.

059

I guess Justin thought it was hard work.

065 After the carpet was removed this is what was left.

So now that everything is out my plan is to replace the carpet, recover the seats, upgrade the audio system (better sounding, blue tooth, dvd for rear passengers, and a rear view camera), and finally put a dash cover on the dash to cover the cracked dash. Today we began working on the seat covers.

dodge interior remodel 003 This is the rear bench seat and where the 3 boys spend most of their travel time on camping trips; so it’s a big friggin mess. I put it up on saw horses and began to take it apart.

dodge interior remodel 004 After taking the plastic covers off I could see the seat release mechanism. This is what holds the seats together and controls the up/down motion of the bottom seat for under seat storage. Before I could get the seat back off I needed to remove this by removing the 2 bolts. This allowed the seat back to come free.

dodge interior remodel 009

Starting with the bottom cushion, I removed the old seat cover by peeling it off.

dodge interior remodel 013 Putting on the new cover was as simple as flipping it inside out and rolling it onto the cushion. Very easy! Leatherseats.com puts a zipper on the back side of the cover to seal it up.

dodge interior remodel 014 After a very similar process, the seat back was covered. We put it all back together and here is the finished product.

dodge interior remodel 015

Next, the passenger seat.

dodge interior remodel 021

We turned the seat upside down and found 4 bolts used to hold the bottom cushion in place. After removing these the cushion was easily removed from the chair.

dodge interior remodel 022 This is a hog-ring. Apparently they are used quite often in upholstery. I found some hog ring pliers and some hog rings at Ace Hardware so that I could tack down the new cover.
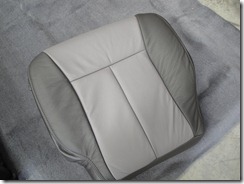
dodge interior remodel 023

The bottom cushion with the new cover.
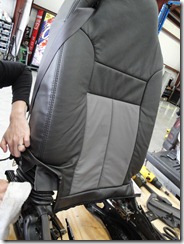
dodge interior remodel 025Now the seat back. This was pretty easy except for the seat belt slot located in the seat back.

dodge interior remodel 026

I cut a slot in the leather and trimmed enough foam and leather to allow the bracket to click back into place.
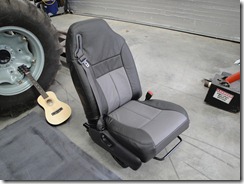
dodge interior remodel 027

The final product.

dodge interior remodel 029 Next the center console. We didn’t finish it today but holy crap what pain in the a$$. More to come later!

Saturday, March 27, 2010

MBRP Exhaust for My Wife’s 2005 Dodge Ram

Last week my wife complained about a new and annoying rattle underneath the truck as she was driving the kids to school. That weekend I crawled underneath the truck and discovered that the exhaust was about to fall apart! The previous owner had removed the muffler and straight piped it. To connect everythign together they welded the joints, which is where it all began to break apart.

018

024 To hold over the busted exhaust I got some flashing and some hose clamps. This kept the weld from breaking completely.

Before we kicked off this project I took some video of the current exhaust. I wanted to have documented proof of the sound improvement.

We always hated this sound. It was very hollow and at highway speeds it would drone and drone and drone.

022 The first step was to break the connection between the catalytic converter and the old broken exhaust. I was a little worried about this because of the type of clamp used and the rust.

027 To get easier access to everything I cut the pipe. Then…

030 I cut it again. This provided some wiggle room needed to pry the hanger bushings off of their support to remove the exhaust from the truck.

031 Old exhaust on the floor.

032 To remove the piece of pipe that was attached to the cat I needed to cut it a little. I used a grinding wheel and cut a 2 inch incision into the pipe. With that taken care of I was able to get a screw driver in there and break the hold. A few bangs with a hammer and the pipe came off.

033 This is the small pipe that was on the cat. You can see the cut I made to remove it.

036 Old exhaust next to new. Notice the new muffler. Yay!

038 The MBRP kit comes with an extension pipe sized for a 8ft bed + a quad cab truck. This truck is a short bed quad cab so that means I needed to cut the pipe. This pic is of the pipe on the vice waiting for the reciprocating saw. The pipe needed to be cut to 10.5 inches plus the flange.

039 The freshly cut pipe and muffler connected.

040 From the muffler to the back of the truck.

046 Now the clamps go on.

048 More clamps.

049 The connection to the catalytic converter.

045 The exhaust tip.

And finally the resulting sound!